처음 소스코드의 버전을 관리하기 시작할 때, 정리해두었던 내용들을 공유해보려고 합니다. git을 이용하며 가장 큰 장점이었던 부분은 “모든 브랜치의 독립성”이었습니다. 여러 Git 계정과 Local 컴퓨터를 사용하며 이 부분을 잘 활용하면, 개인적으로 매우 편리하게 사용할 수 있습니다. 자, 이야기를 시작해보겠습니다.
1. Git Installation and basic operation
git 설치는 https://git-scm.com/book/en/v2/Getting-Started-Installing-Git를 참조해 해보자.
1.1 git init
“init”은 remote를 local로 내려받기 전에, git 환경을 생성하거나 초기화 하기 위한 커맨드이다.
git init
1.2 git clone
“clone”은 remote를 local로 복사붙여넣기 하는 것이다.
git clone <url>
1.3 remote(server)
“remote”라는 개념은 간단히 git 혹은 gitlab에 올라가 있는 repository를 의미한다. 처음 local(computer)에 등록할 때, 다음 명령을 써서 등록을 하며 동시에 이름을 붙일 수 있다.
git remote add origin [Name-of-repository]
그리고 등록된 remote repository는 아래 명령어로 리스트와 각 이름을 확인 할 수 있다.
git remote -v
참고로 remote repository를 등록할 시, ssh key가 등록돼 있다면 git@github.com:ooshyun/[Name-of-repository].git로 되는데, ssh configuration에 따라
git@private-github.com:ooshyun/[Name-of-repository].git 과같이 github.com을 수정해서 여러개의 계정을 관리할 수 있다. ssh key의 경우 vim ~/.ssh/config 에서
Host, Hostname, User, IdnetityFile을 등록하면 앞선 예와 같이 사용할 수 있는데, 만약 아래와 같이 등록하면
Host master-github.com
  HostName github.com
  User git
  IdentityFile ~/.ssh/id_rsa_master
git remote를 등록하는 host는 git@master-github.com:[Name-of-repository] 가 된다. IdentityFile은 ssh-keygen 명령어로 생성한 key를 의미한다.
1.4 local(computer)
“local”은 내가 운영하고 있는 컴퓨터를 의미한다. remote에서 ssh 등록 혹은 clone을 통해 올라가 있는 repository를 local로 내려받을 수 있고, remote의 업데이틀 체크할 수 있다. remote의 상태를 내려 받는 명령어는 아래와 같다.
git fetch --all
업데이트 된 경우, 업데이트 사항이 local로 내려온다. 하지만 이를 기존에 가지고 있는 remote의 local repository로 업데이트 할 것이냐, 말 것이냐는 각 상태에 따라 결정해야 한다. 만약 local repository가 업데이트 되지 않은 상태에서 다른 repository로 움직이려 하면 “behind”라는 문구와 함께 command line에 나타날 것이다. 이는 이동중 conflict가 날 수 있으므로 주의해야 한다.
그리고 local repository로 업데이트(다운로드 한다!) 하는 명령어는 아래와 같다.
git pull origin master
명령어를 실행하면, remote의 “origin”으로 등록한 repository는 local에 master로 등록이 될 것이다.
git pull
그리고 위 명령어와 같이 따로 내려받는 위치를 지정하지 않는 경우, 동일한 이름을 가진 branch로 remote에서 local로 데이터가 업데이트 된다.
1.5 git branch
“branch”는 remote에서 받은 repository와 local에서 만든 repository를 의미한다. 이를 전부 보고 싶다면,
git branch -a
remote만 보는 경우,
git branch -r
local만 보는 경우,
git branch
명령어를 사용하면 된다. branch를 제거하는 경우 fully-merge한 경우,
git branch -d <branch name>
branch를 강제로 제거하는 경우,
git branch -D <branch name>
를 사용한다.
1.6 git checkout
“checkout”은 user가 local에 있는 branch를 옮길 때 사용한다. 만약 branch가 없는 경우는,
git checkout -b "branch name"
를 사용하고 branch가 있는 경우는,
git checkout "branch name"
를 사용한다. 그리고 만약 현재 branch에서 업데이트 추가된 사항을 제거하고 싶다면
git checkout .
를 사용하면 된다. 반드시 “local”에 있는 branch임을 명시해야 한다.
2. Git branch tree
위 명령어를 익히면, 이제 “어떻게 branch를 관리 해야하는지”에 대해 질문을 가질 수 있다. 필자는 이 질문에 대해 다음과 같이 branch tree 를 구성했다.
	SDK
		└── origin(master)
			└── dev
				├── bugfix
				│ 	   ├── bugfix_0
				│ 	   ├── bugfix_1
				│ 		   ...
				├── feature
				│ 	   ├── feature_0
				│ 	   ├── feature_1
				│ 		   ...
				├── test
				│ 	   ├── test_0
				│ 	   ├── test_1
				│ 		   ...
				└── release
					├── release_0
					├── release_1
						...
- feature: should contain new code or new implementations to the repo
- improvement: updates or improves existing code in the repo
- bugfix: troubleshooting branch for all branches
- hotfix: troubleshooting branch for master
- test: only for testing, this type of branch will never get merged
- dev: the development branch
- release: the stable and tested version of the dev branch that was released externally
- master: the stable and tested version of the release branch
- SDK: the default sample code from the vendor before any modification added (boiler plate)
여기서 주로 사용하는 branch은 master, dev(development), feature, test, release 이다.
feature는 개발을 하는 작은 단위의 기능을, test는 여러 feature를 통합한 source code를 “test vector”를 만들어서 한 테스트, 그리고 release는 test가 완료되면 실제 기기에서 하기 위한 테스트를 의미한다. dev의 경우 development의 약자로, 개발의 중심 라인이다. 이는 여러 feature가 기기에서 하나의 단위로 동작하기 위해 합쳐지는(merge) 것을 의미한다. 그리고 dev에서 origin으로 업데이트 하는 경우는 서비스의 end단에서 user의 테스트가 모두 완료된 경우에만 해당한다.
3. Git command to manage the project
3.1 git commit
“commit”은 변경된 branch의 내용을 해당 branch에 업데이트하는 것이다. 이는 message와 함께 업데이트를 하는,
git commit -m "message"
이 경우와 message 없이 업데이트를 하는,
git commit
이 경우가 있다. 메세지가 없는 경우는 source tree에서는 uncommited changes라고 명시되며 commit message를 입력할 수 있다. commit message의 경우 수정이 불가하니, 참고하자. 하지만 command line에서는 바로 입력하라는 vi 환경이 나타나며, 입력하지 않는 경우 commit이 abort된다.
3.2 staged file
“staged file” 은 Source tree에서 보여지는 옵션으로 command line에서는 아래 명령을 통해 초록색 글자로 볼 수 있다.
git status
이는 commit을 하는 경우에 해당 branch로 업데이트 하는 파일을 의미한다.
3.3 unstaged file
“unstaged file” 은 Source tree에서 보여지는 옵션으로 command line에서는 아래 명령을 통해 빨간색 글자와 “Untracked file로 볼 수 있다.
git status
이는 commit을 하는 경우에 해당 branch로 업데이트 하지 않는 파일을 의미한다.
3.4 git add
“add”는 업데이트를 하는 경우에 해당 branch로 업데이트 하는 파일을 추가할 때 사용한다. 해당 폴더내에 모든 파일을 업데이트하는 경우,
git add .
를 사용하고 특정 폴더나 파일을 업데이트하는 경우,
git add "path to file_0" "path to file_1" ...
을 사용하면 된다. 업데이트 하고/하지 않는 파일의 리스트는 아래 명령어를 통해 command line에서 볼 수 있다.
git status
그리고 업데이트 하지 않을 파일을 각 폴더에 미리 명시해 놓는 경우, .gitignore 파일을 사용할 수 있다.
# Example. .gitignore
	/* 			# Ignore Everything
	!test.c 	# Except file
	!**.txt 	# All file including .txt
	!Test/ 		# All file in the Test folder
	test.c 		# Ignore a file
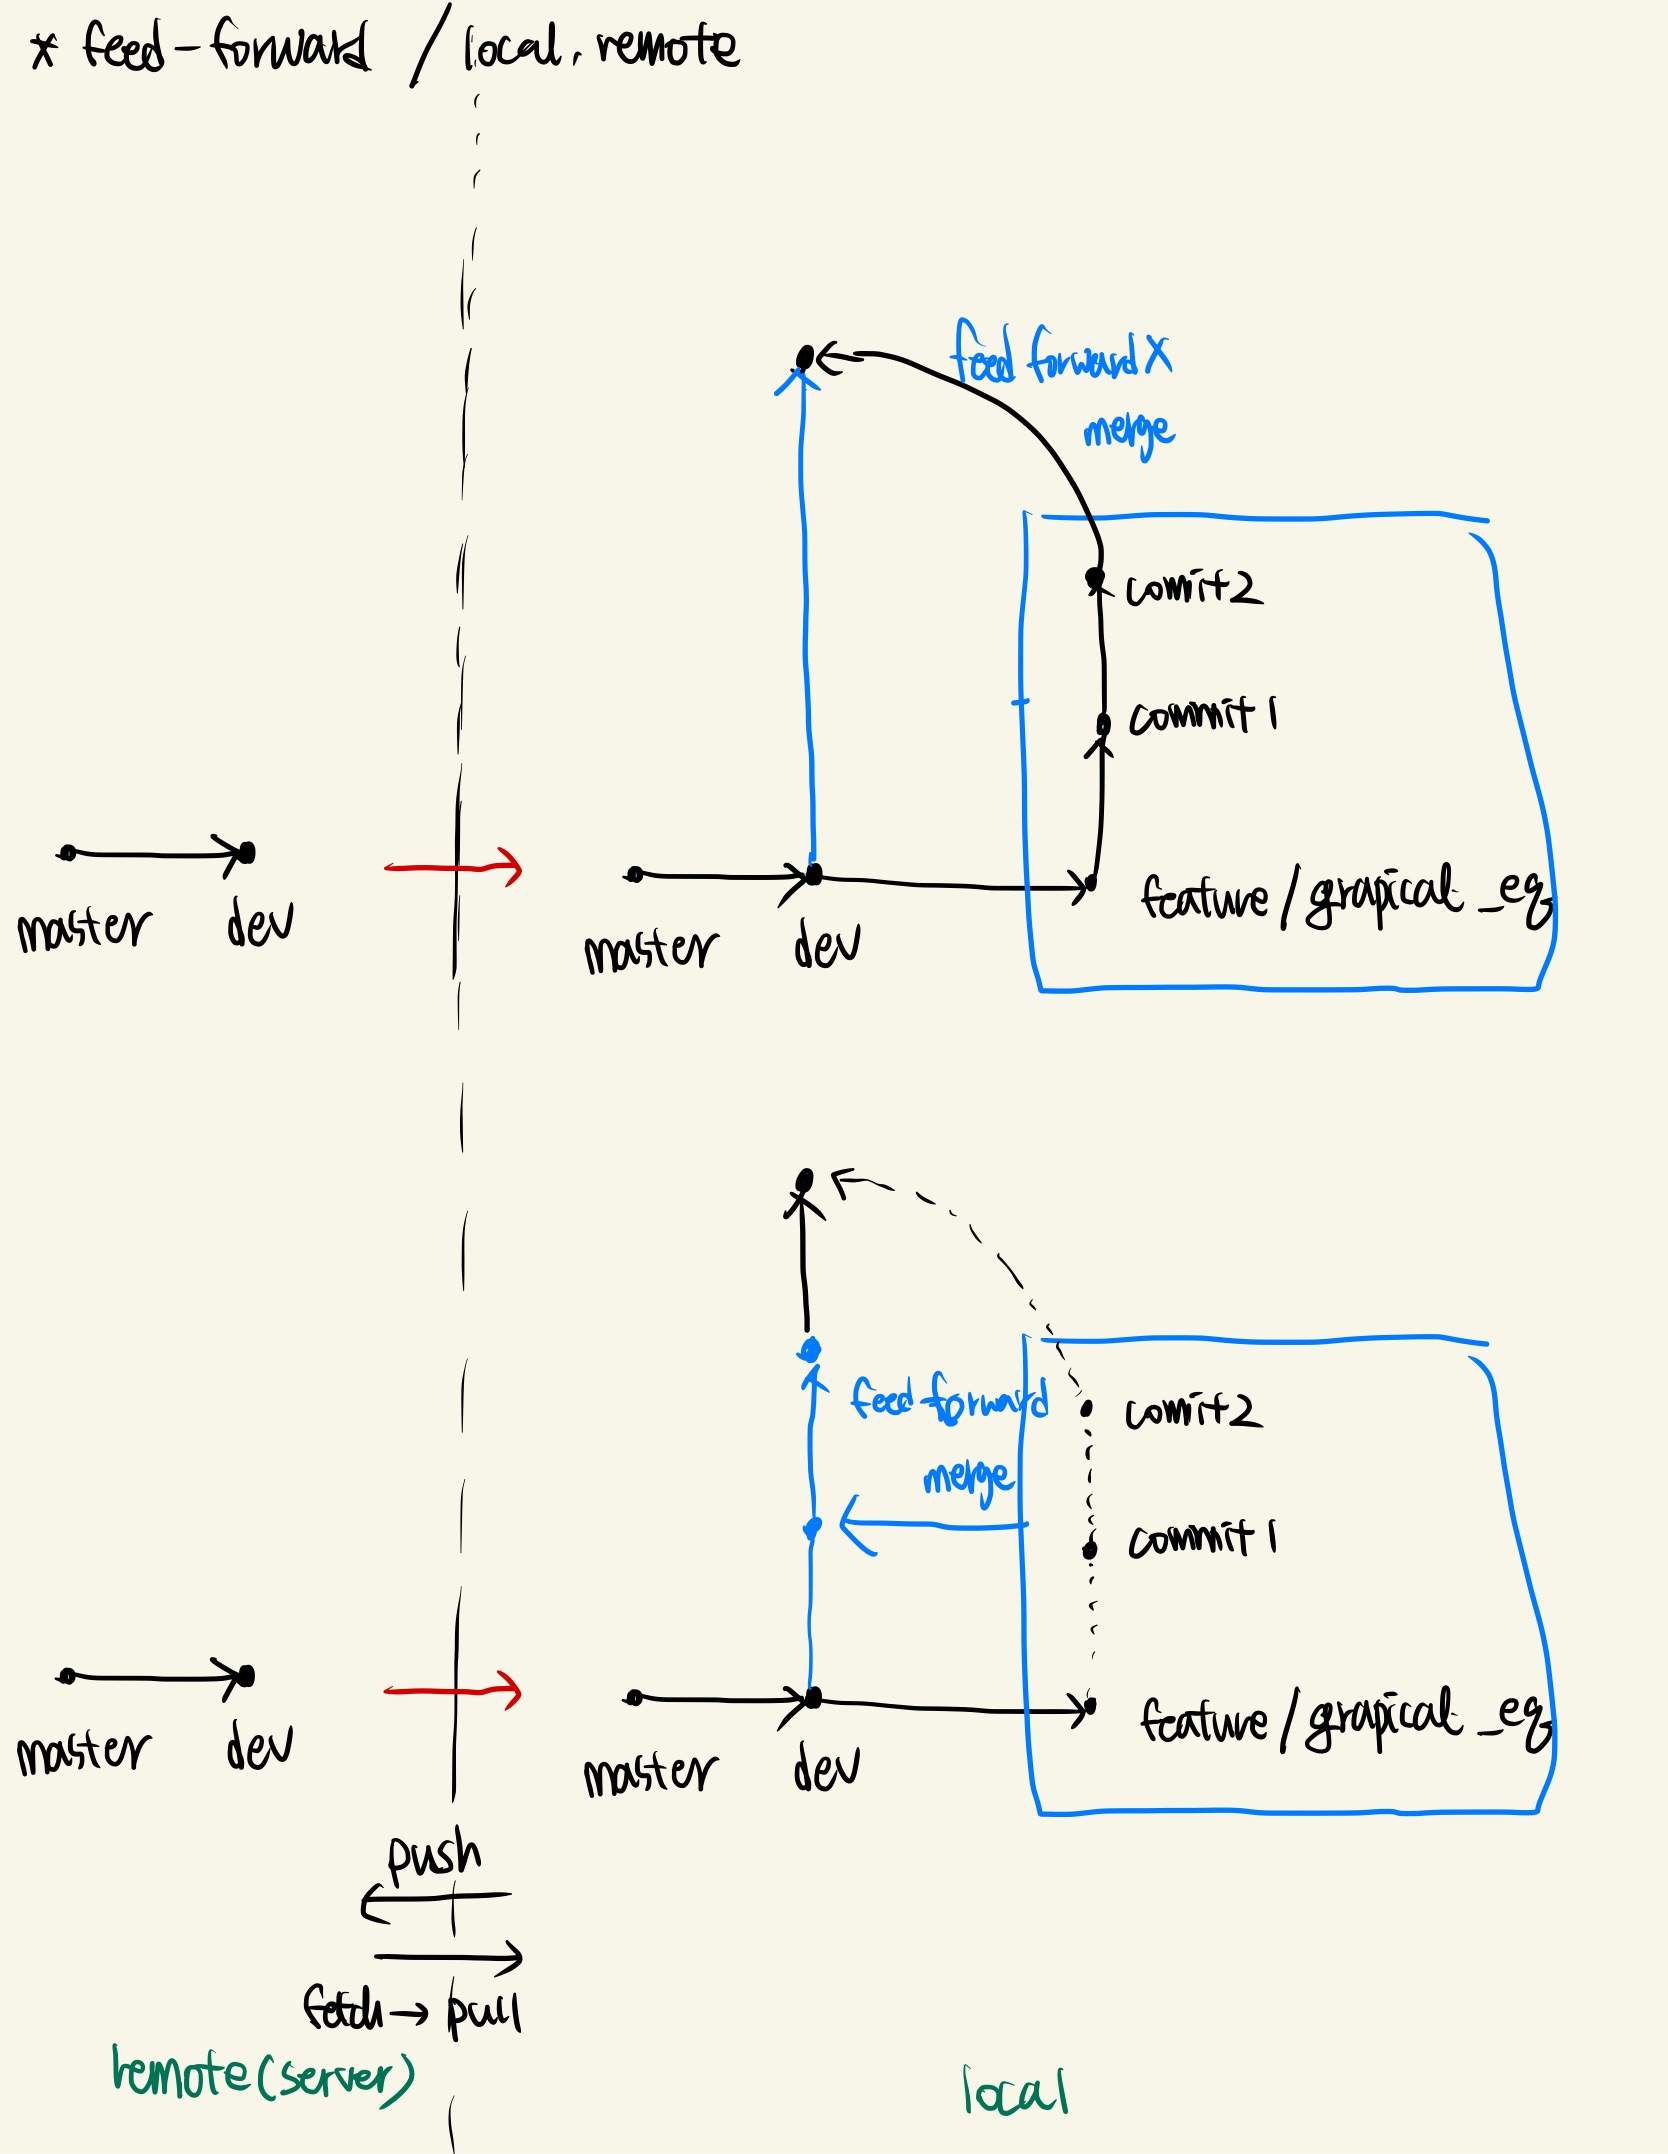
3.5 git merge
“local merge”은 변경한 branch의 내용을 뻗어나온 branch에 업데이트하는 것이다. 이는 root branch로 이동하여 진행하며,
git merge "root branch name" "update branch name""
를 이용하여 merge를 진행한다. 이 경우 두 가지 방식으로 merge가 될 수 있다.
-
(default) fast-forward
- merge 명령어를 할 시, default로 제공하는 옵션이다. 위에서 언급하였듯, 변경한 branch를 업데이트하는 경우에 변경한 branch에 있는 commit message가 root branch에 모두 기록되는 경우이다. 이 경우 변경한 branch는 업데이트 이후 사라진ㄷ.
-
no fast-forward
변경한 branch를 업데이트하는 경우에 변경한 branch에 있는 commit message가 branch와 commit message를 유지한 상태로 root branch에 변경된 내용을 업데이트 한다. 이는 branch의 history를 볼 때 root와 feature 등 여러 branch로 구분지어 볼 수 있어 더 명료히 볼 수 있다. 이는 merge시 다음 옵션을 추가해 명령어를 사용해야 한다.
git merge --no-ff "root branch name" "update branch name" -
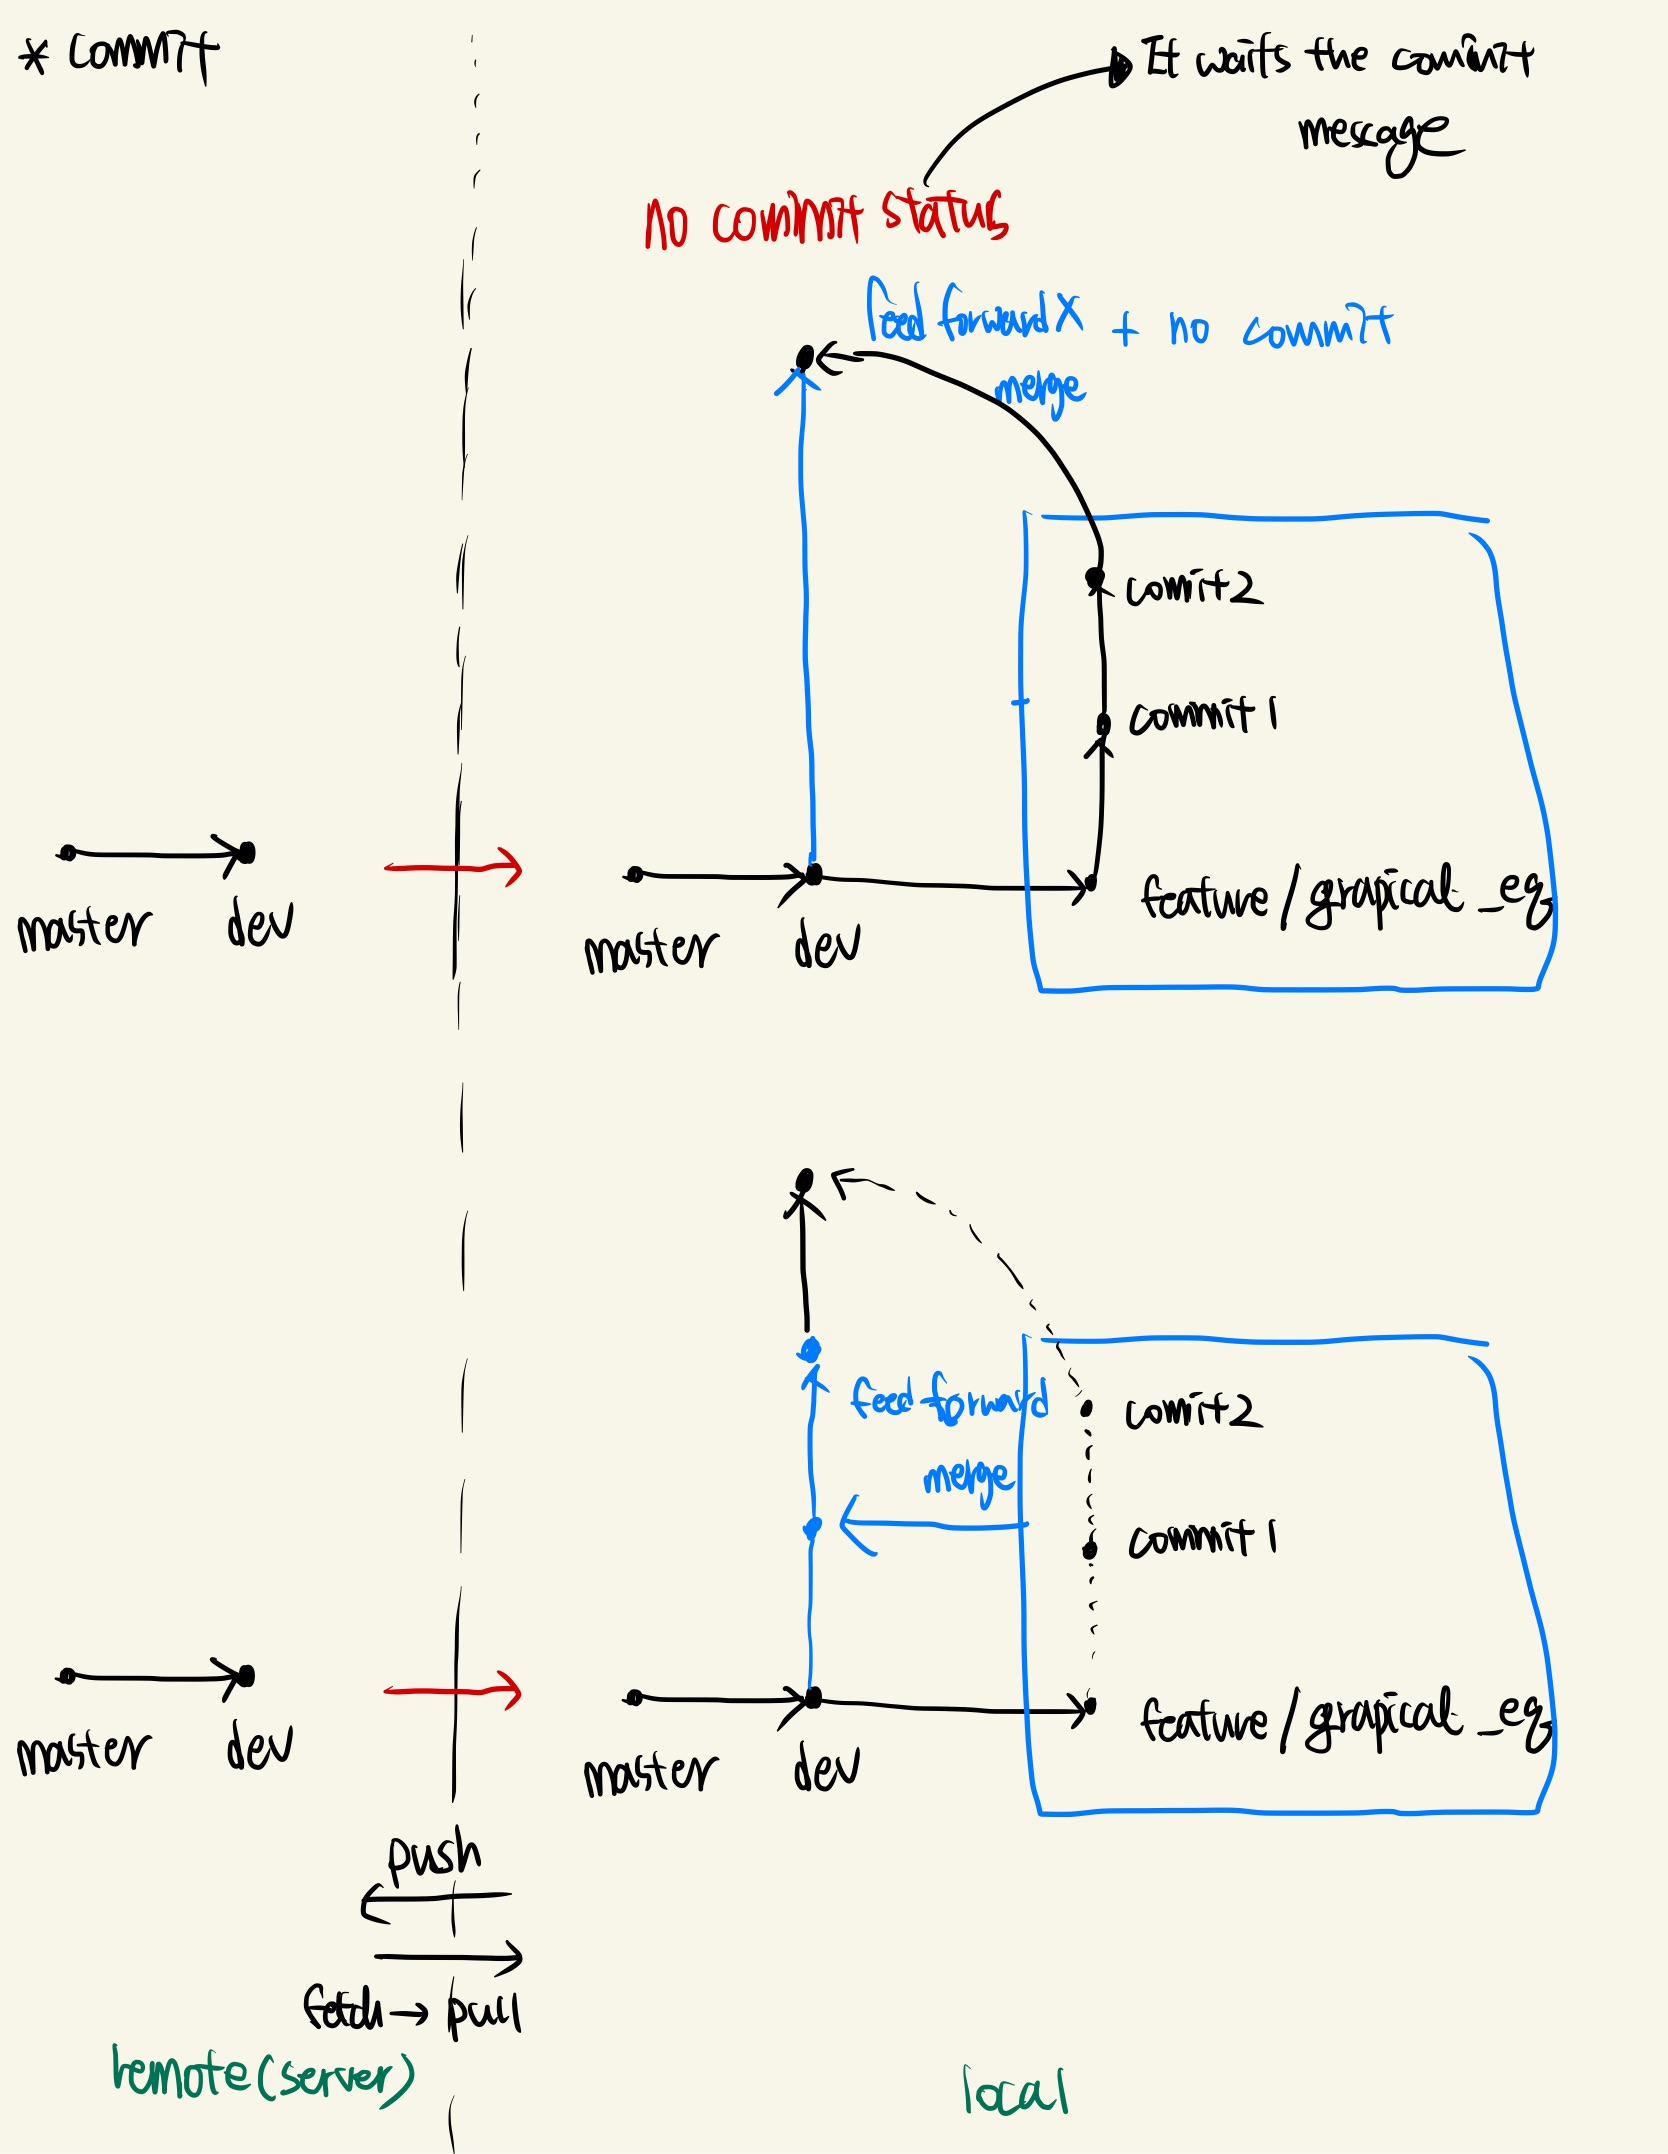
no commit message
branch를 merge할 때 commit message를 입력하지 않고 이후에 입력하려고 할 때 다음 명령어를 사용할 수 있다.
git merge --no-commit "root branch name" "update branch name"이 경우 git commit 으로 merge를 완료하라는 메세지가 완료할 때까지 계속 나타난다.
3.6 [TODO] git rebase
아직 rebase를 쓰는 경우가 없어 추후에 업데이트 하도록 하겠다.
3.7 git reset
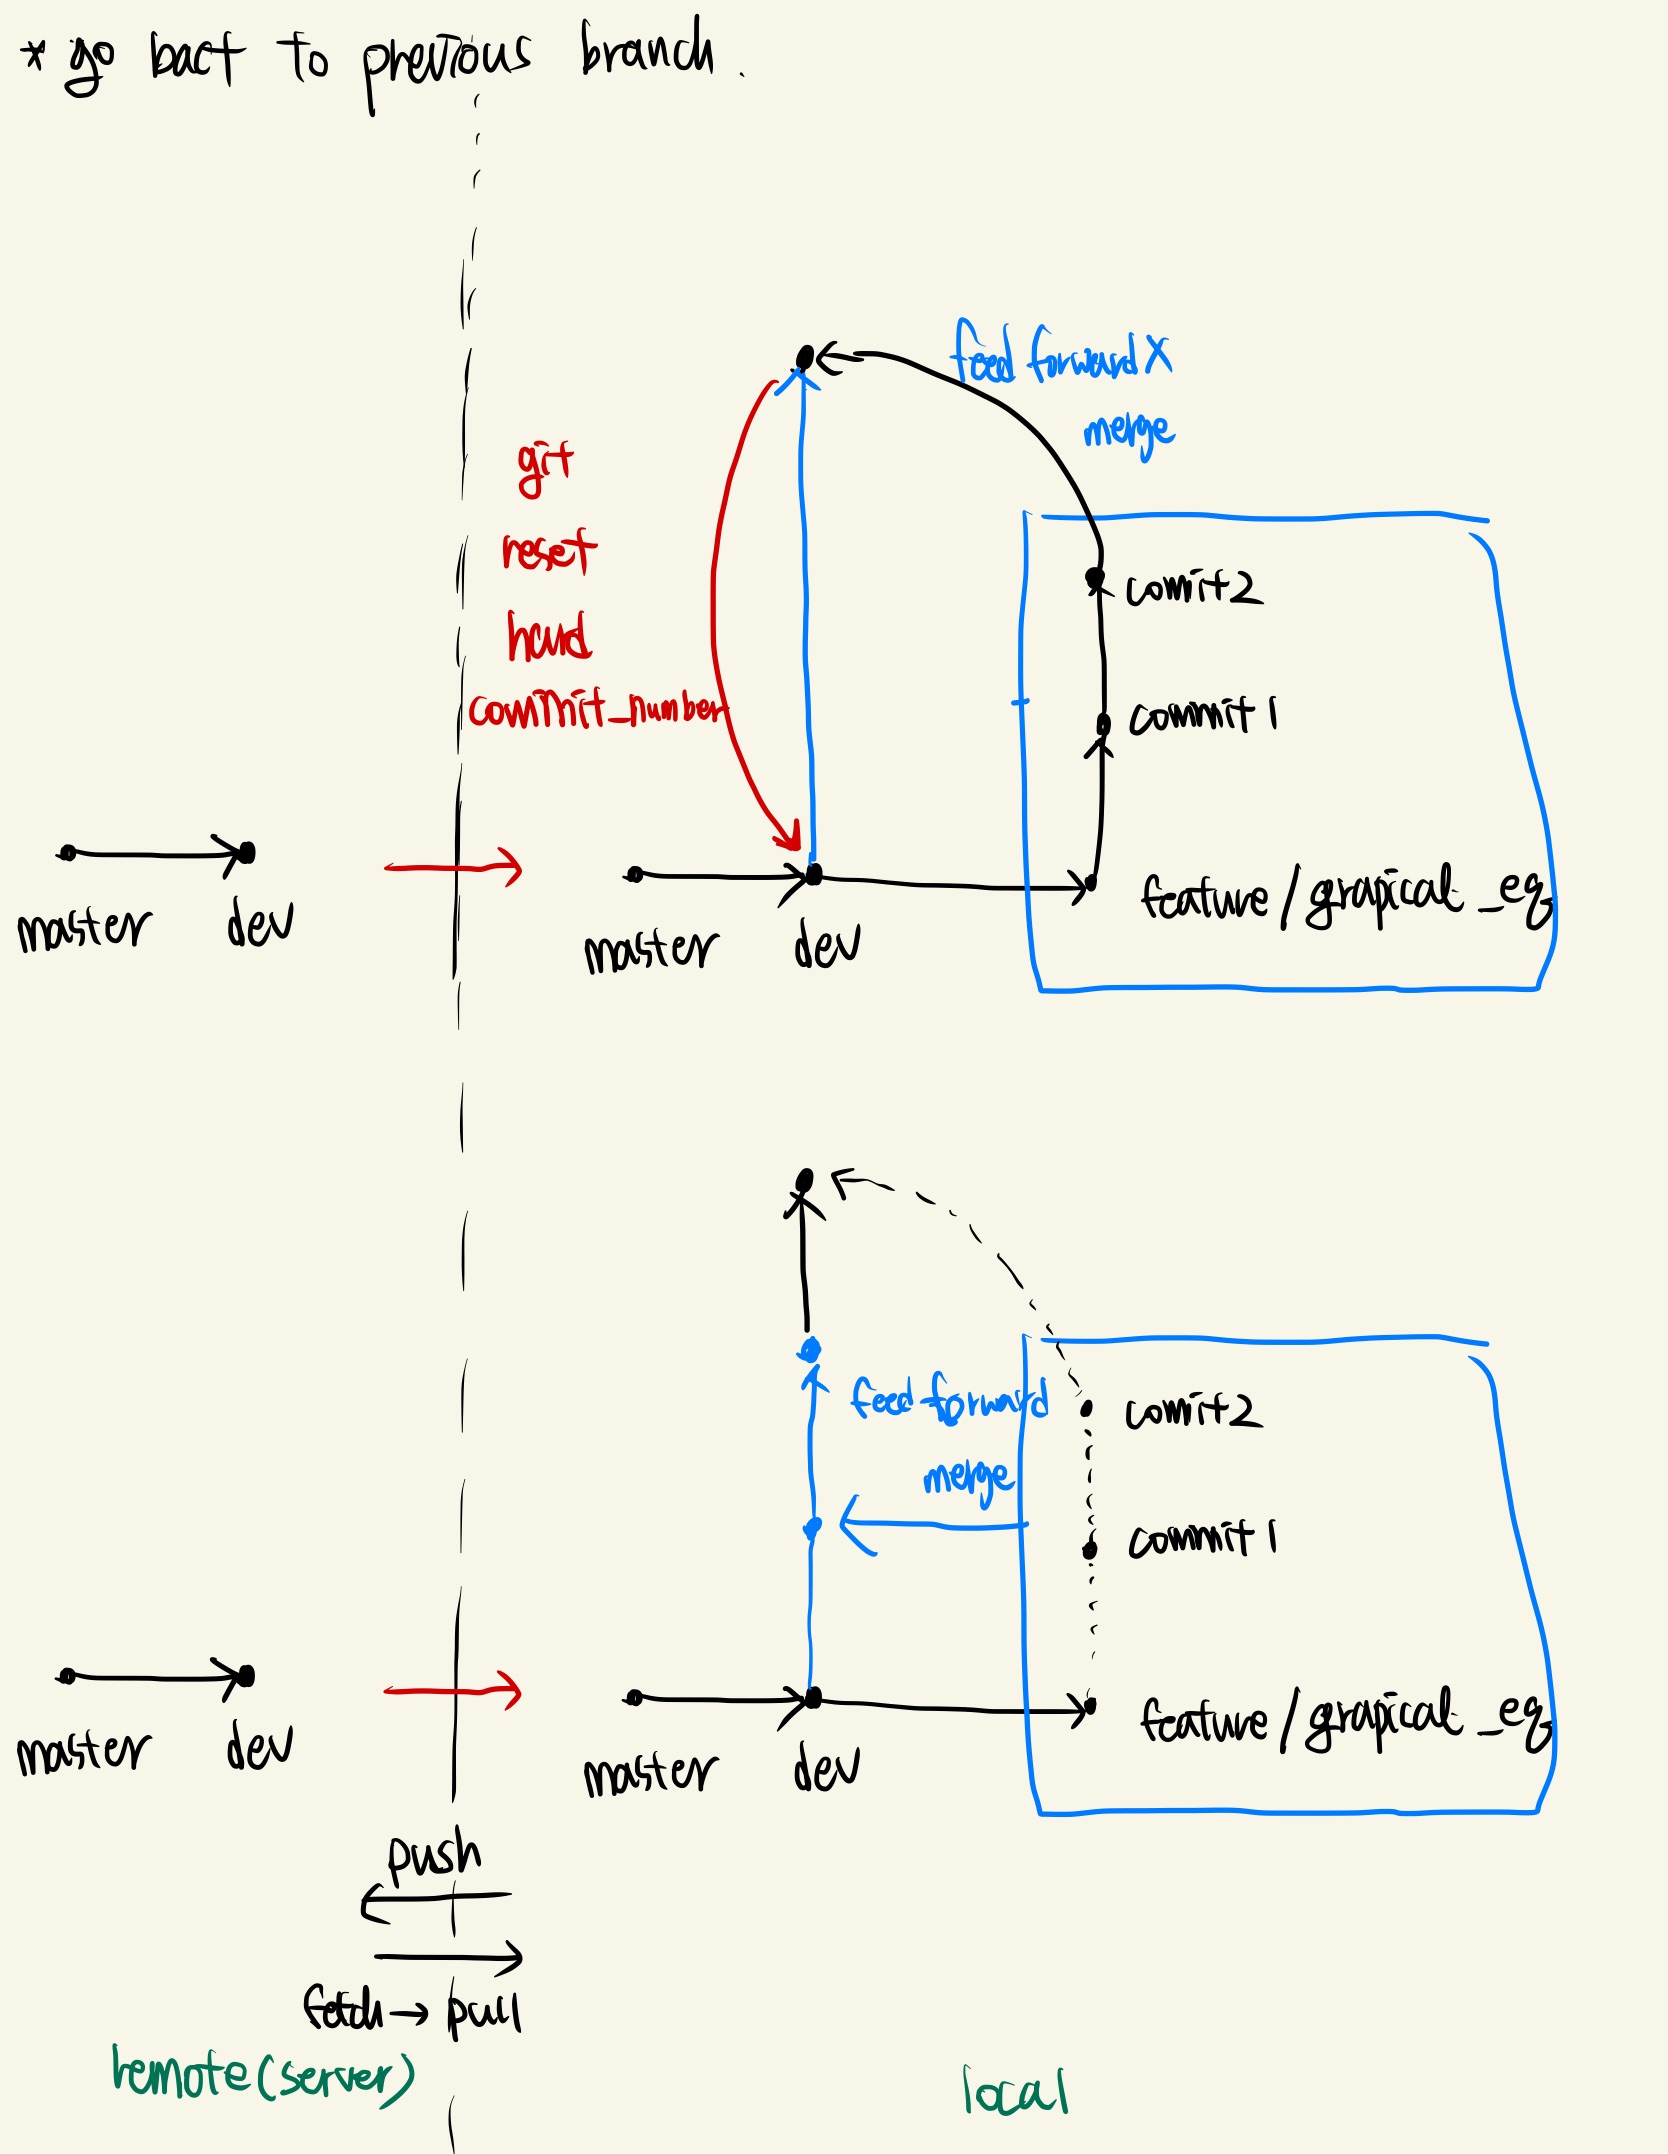
reset은 크게 두 가지 기능을 사용했다. branch에서 add를 통해 업데이트 한 부분을 지우는 경우와 commit을 한 이후에 이전 commit 혹은 상태로 돌아가는 경우이다. add를 통해서 업데이트한 내용의 경우,
git reset
를 이용해서 되돌릴 수 있다. commit을 통해 업데이트를 한 경우는
git reset --hard "commit-number"
를 통해 command line에서 확인할 수 있다. commit-number는
git log
를 통해 command line에서 확인할 수 있다. git log의 경우 현재 branch의 history를 볼 수 있다.
3.8 git tag
“tag”는 commit과 다르게 수정, 삭제, 추가가 가능하다. 그리고 source tree를 통해서도 tag만 따로 분류가 가능하다. tag 옵션의 경우 git tag --help를 참조하자.
3.9 git push
“push”는 local에 있는 branch를 remote로 업데이트할 때 사용한다. git push “remote branch name” “local branch name” 만약 remote에 local branch가 없는 경우 branch가 새로 만들어지며, 그렇지 않은 경우는 업데이트 된다.
4. Diagram for git flow
4.1 feed-forward

4.2 commit

4.3 go back to previous branch

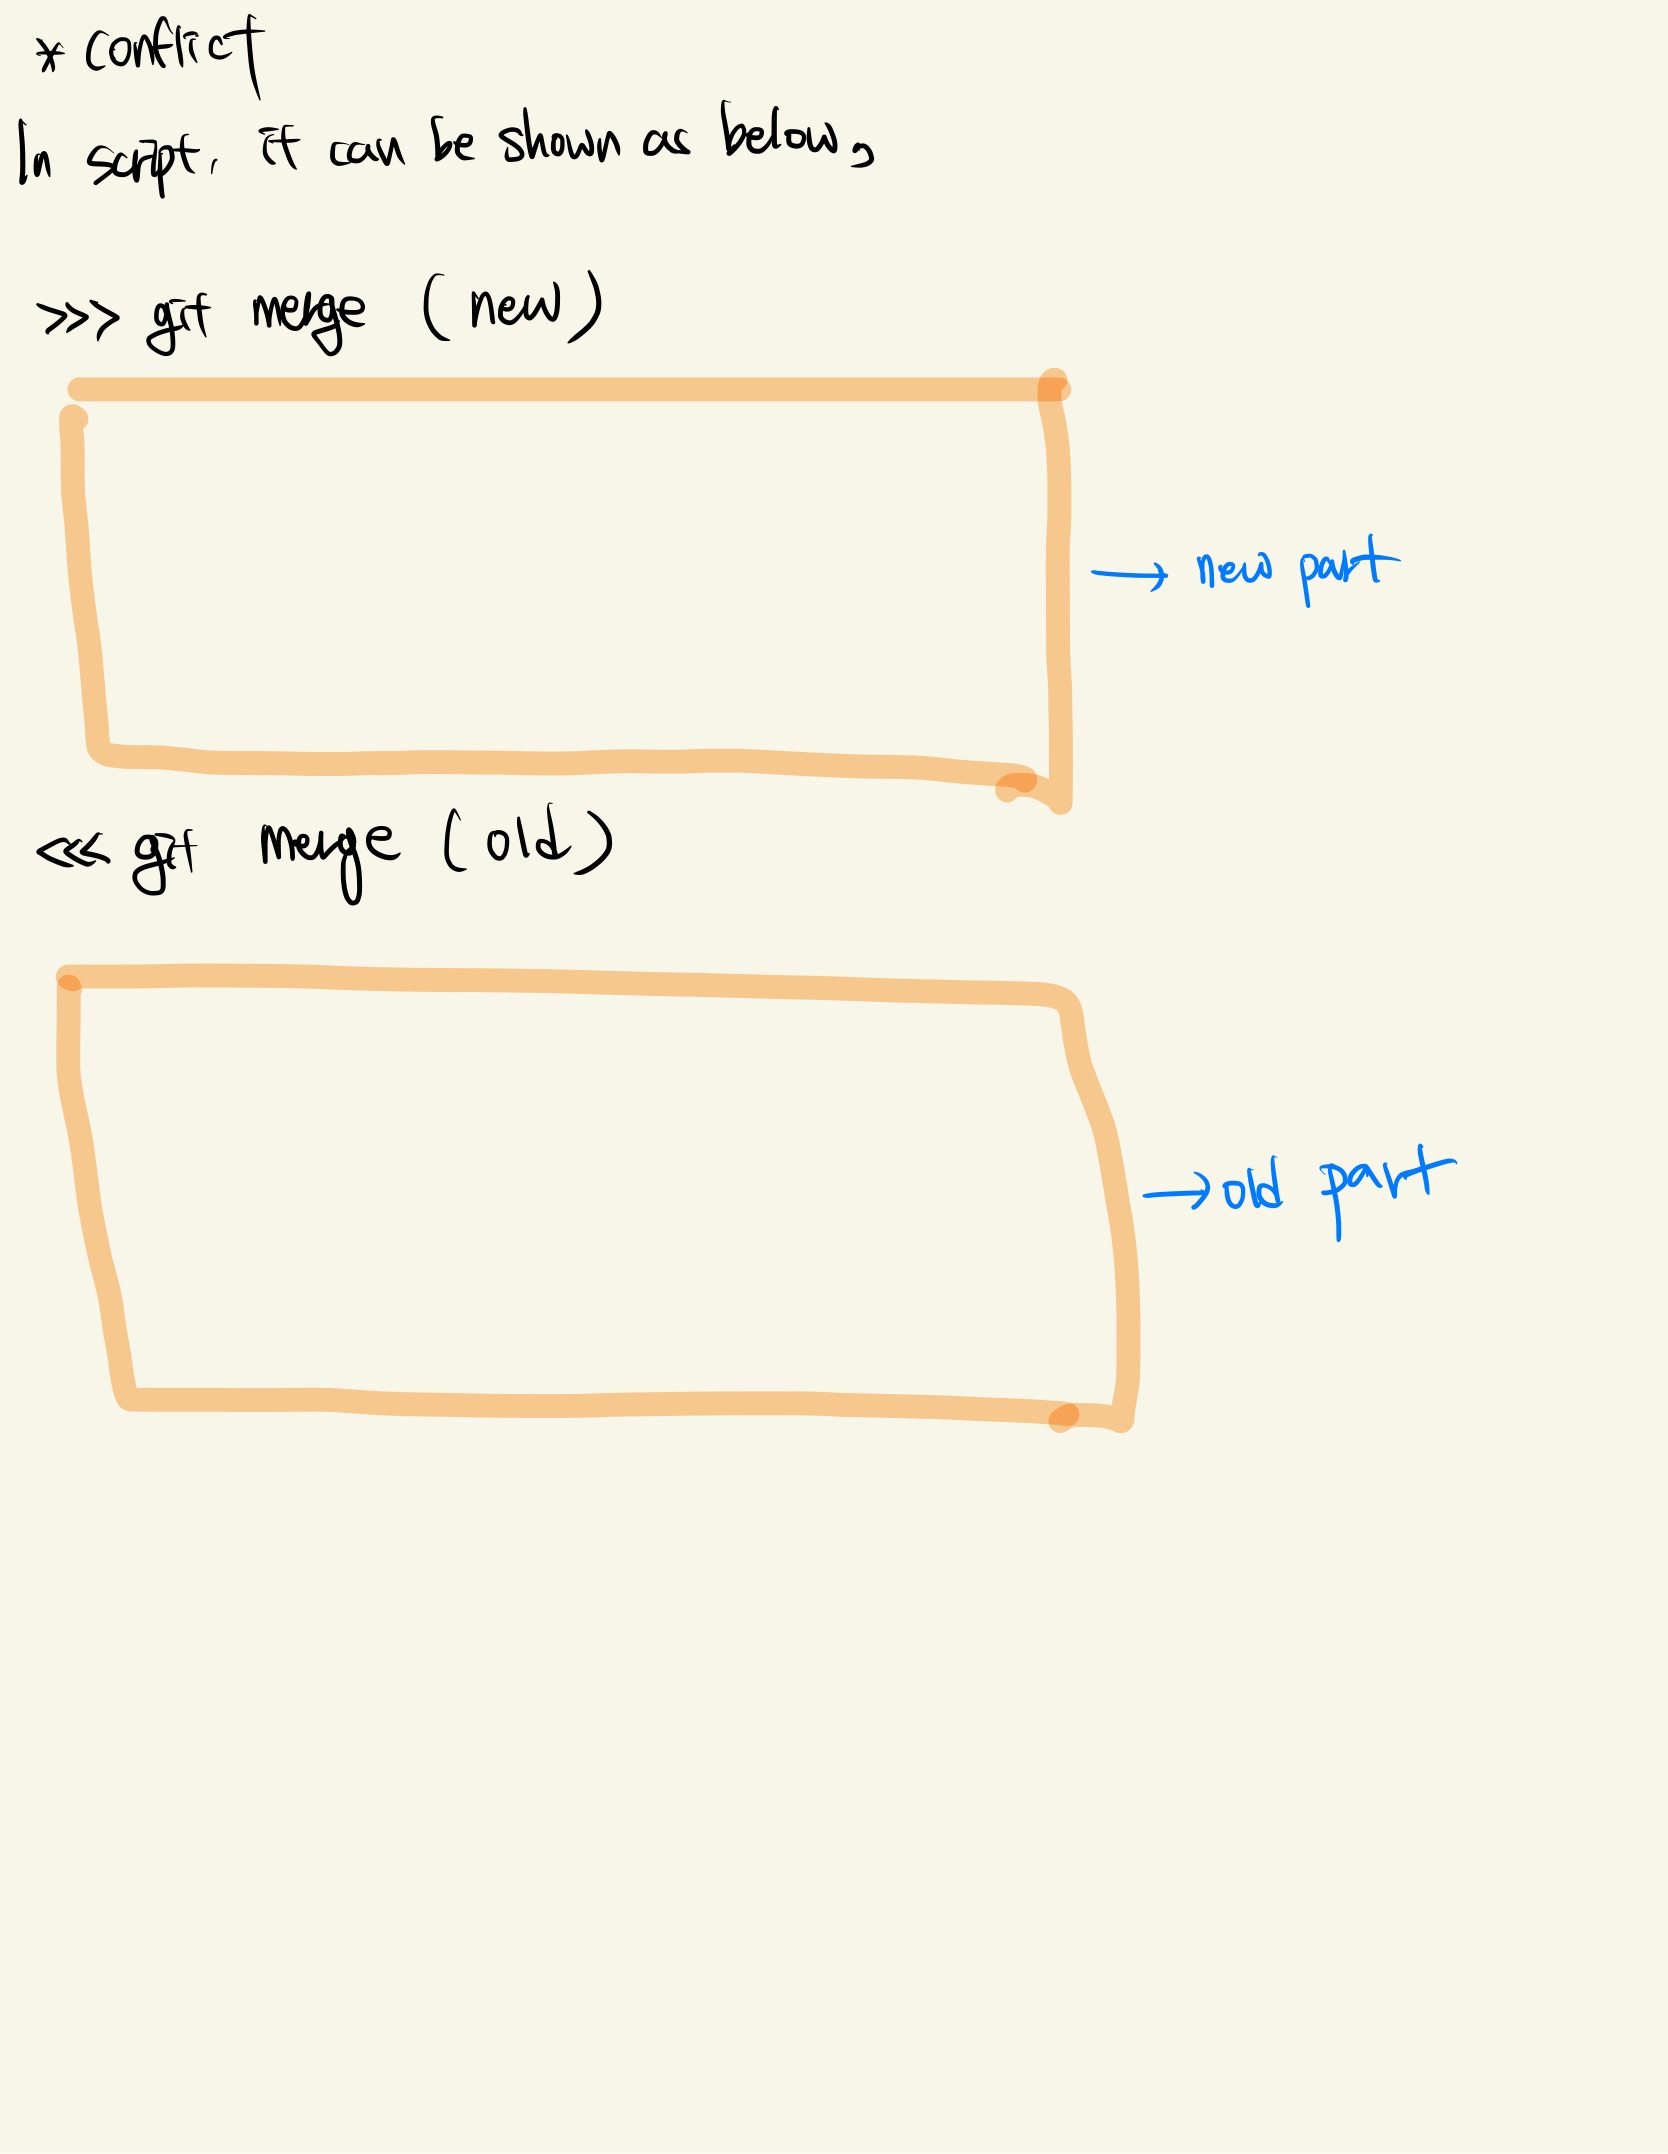
4.4 confilct, solve

5. Tool
필자는 터미널을 이용하지만, 참고로 아래와 같은 툴을 사용할 수 있다.
- Source Tree - GUI tool
- kdiff3 - Merging/diff tool
- vscode - Possible to use for Merging/diff tool